Old houses are full of charm—hardwood floors, vintage details, and unique architecture. But when it comes to modern upgrades like installing a doorbell chime, that charm can sometimes feel like a challenge. Outdated wiring, hidden junction boxes, or a lack of transformers are common roadblocks.
Don’t worry, though. Installing a doorbell chime in an old house is not only possible—it’s a project you can handle with some basic tools, a clear plan, and a little patience. This guide will walk you through everything step by step, from gathering the right tools to testing your new chime. We’ll also cover both wired and wireless doorbell options, safety tips, and troubleshooting advice to make sure you’re confident in tackling the job.
Installing a doorbell chime in an old house might seem a bit tricky. But with the right tools and a clear plan it is a project you can definitely tackle. Older homes often come with their own set of challenges like outdated wiring or limited access to power sources. However this guide will walk you through each step. Ensuring you can successfully add a functional and charming doorbell to your vintage home.
Tools and Materials Checklist
Before you start, gather all the essentials. Think of this as packing your “DIY toolbox” so you don’t have to run back and forth in the middle of the job.
Screwdriver (flathead and Phillips)
Drill with appropriate bits
Wire stripper or cutter
Voltage tester (a must for safety)
Level
Doorbell kit (chime, button, transformer)
Electrical tape
Masking tape and pen (for labeling wires)
Pro Tip: Labeling wires with masking tape before disconnecting them is like leaving breadcrumbs—you’ll always know where each one belongs.
Wired vs. Wireless Doorbell Options for Old Homes
Not all old houses are wired the same. Some may already have existing (but hidden) doorbell wiring, while others may not. Here’s what you need to know:
🔌 Wired Doorbell Systems
Pros: Reliable, no need to replace batteries, classic look and sound.
Cons: Requires access to wiring, may involve running new wires in walls, needs a transformer.
📡 Wireless Doorbell Systems
Pros: Easy installation, no wiring required, portable chime units, ideal if your old house has outdated or missing wiring.
Cons: Batteries need replacing, range can be limited by thick walls, may not feel as “authentic” as a wired chime.
Analogy: Think of wired doorbells as “landline phones”—stable and always connected. Wireless systems are like smartphones—flexible, portable, but dependent on batteries.
Safety First ⚡
Electrical work, even simple doorbell installation, involves risk. Always:
Turn off power at the breaker before working with any wires.
Test circuits using a voltage tester to confirm no current is flowing.
If you’re not comfortable with wiring, consult a licensed electrician—it’s better to spend a little more than to risk your safety.
Step-by-Step Guide: How to Install a Doorbell Chime in an Old House
1. Turn Off the Power
Locate your home’s breaker box.
Switch off the breaker for the circuit where you’ll be working.
Use a voltage tester on the wires to confirm the power is completely off before touching anything.
2. Mount the Transformer
Find a spot near your electrical panel for the transformer.
Secure it with screws.
Connect the transformer’s wires to the household supply following the manufacturer’s instructions.
Remember: most modern chimes run on 16V transformers.
3. Install the Doorbell Button
Choose a visible spot near your front door.
Drill pilot holes and mount the button securely.
Run the doorbell wire from the button to the transformer and the chime unit.
4. Mount the Chime Unit
Pick a central location indoors (hallway or living room works best).
Use a level to ensure it hangs straight.
Drill holes and mount the chime unit to the wall.
5. Connect the Wiring
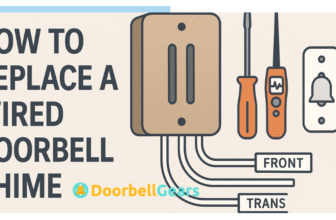
At the chime unit, connect wires to the correct terminals:
Front → front door button
Trans → transformer
Rear → rear door button (optional)
Tighten screws securely and check that no wires are loose.
6. Restore Power and Test
Flip the breaker back on.
Press the doorbell button.
If the chime rings clearly—congratulations!
If not, check connections, tighten screws, and confirm the transformer is working.
Troubleshooting Common Problems
Even if you follow every step, old homes have quirks. Here are some common issues and fixes:
Weak or No Chime Sound
Check if the transformer matches your doorbell’s voltage (usually 16V).
Tighten wire connections.
Replace old or corroded wires.
Confusing or Hidden Wiring
Use a wire toner or circuit tracer to locate hidden wires in walls.
Look near door frames, basements, and attics—these are common wire paths
Old Transformer Issues
If your house doesn’t have a transformer, install a new one near the electrical panel.
If the existing transformer is outdated, replace it with a modern unit.
Prefer Not to Run New Wires?
Opt for a wireless doorbell. It’s a plug-and-play solution that avoids wiring headaches entirely.
FAQ
How do I locate existing doorbell wiring in an old house?
Check around the front door, basement, or attic. Use a wire tracer if the wires aren’t visible.
What if my old house doesn’t have a doorbell transformer?
Install a new one near your electrical panel. Always shut off the main power before starting.
Can I use a wireless doorbell chime instead of a wired one?
Yes—wireless systems are ideal for old homes where wiring is hidden or damaged.
How do I make sure my chime is compatible with my button?
Check the voltage rating (usually 16V). Match button, transformer, and chime specs.
Can I install a video doorbell in an old house?
Yes, but video doorbells often need stronger transformers or direct connection to a power source. If wiring is too complex, use a battery-powered model.
Conclusion
Installing a doorbell chime in an old house may feel intimidating, but it’s entirely doable with the right tools, a bit of patience, and a safety-first mindset. By turning off the power, mounting the transformer, installing the button and chime, connecting the wiring, and testing carefully, you’ll bring a modern convenience into your vintage home without losing its charm.


I am David Echols working with doorbellgears.com. I and my team of experts have been working in the security industry for 10 years and have a wealth of knowledge when it comes to doorbells, security cameras, video doorbells, door chimes, intercom doorbells, and others. My team is confident in their ability to provide helpful reviews and blog content that will assist readers in resolving security issues in their homes and offices. Honestly speaking, they are passionate about helping people to find the right security solution for their home or office. In this blog article, we discuss some new gadgetry that can be used to improve indoor security. If you're looking for some new gadgetry to improve your home security, then David Echols is definitely the person to ask! Our Areas of Expertise Home security products, Smart home devices.